Pages

Monday, 17 September 2012

Experimenting with lighting...

I have been on holiday in Benidorm since last weekend and only just got back (freezing here!), but before that I did some quick lighting experiments with my old DP3 work from my second year in 3ds max. I didn't get chance to post them before I went, so am doing so now! :)

Here are the renders I did - a couple for each piece of work (so far...):

Still Life Visualisation Project:

Evening time with volume light

Night time with a cool feel

Morning/midday - very bright sunlight from window - happy feel?

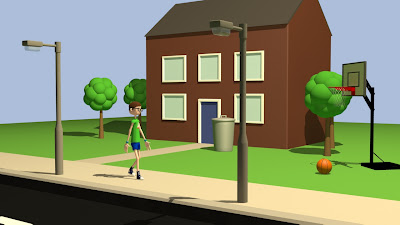
Silent Comedy Animation Project

Daytime with warm-feeling sunshine

Nighttime with a cooler feel, but with yellowish street lights.

'Of Mice and Men' Bunkhouse Visualisation Project

Night time with cool feel

Night time with cool feel - stove light

Morning light with warm feel and volume effects

Morning light with warm feel - subtle stove light

I feel this has helped me a lot with lighting a scene dependent on time of day and mood, and think I am improving with my overall skills using the standard lighting within 3ds max. However, I am still unsure on how to use some lighting systems and photometric lights, which I will look into more in the next few days. I am still also gradually collecting more research and articles to help with the project and examples of 3d environments that inspire me. I may also experiment with how post-production techniques can produce similar effects too. :)

Tuesday, 28 August 2012

3drender.com Challenge :)

I chose a pretty old rendering challenge from 3drender.com to help practice texturing and lighting to create different atmospheres in environments. I chose the simplest one I could find for now, as I wanted to focus on lighting and effects at first rather than texturing for hours on end!

http://www.3drender.com/challenges/candles/index.htm

So this is pretty similar to the still life project I did earlier in my second year for visualisation in DP3, a few objects on a surface, but this time features the addition of candles.

I approached it quite basically in terms of lighting, by adding a main directional light source from the right using shadow maps, then some omni lights for the candles with added glow effects. I also added some fills to add a slight impression of light bouncing off other surfaces. For example, a brown tinted light from below the wood surface and a pale beige one both above and from the left, both at intensities of about 0.3-0.5.

In my first example, I tried to create a cold, dark night atmosphere to the image by basically tinting the main lights with quite strong blues and using a lower intensity (0.5-0.7). I used a similar technique to create a warmer, brighter mood in the second example, by using yellow/orange tinted lights with stronger intensities (1-1.5). In both examples I also used render elements to render out zdepth maps, which I used to create a lens blur effect in Photoshop, adding depth of field.


This is quite simple for now, but I plan to experiment more, perhaps with my previous work for my second year (still life, character animation, chess player, etc.), as these are already textured so won't use up too much of my time! I am also constantly still finding resources for this project and completing more reviews of cinematography, which I will post soon. :)

Tuesday, 21 August 2012

Research Time (Finally..)

I have finally started to gather a bit of research for the big research project in my third year, which is creeping up a bit too quickly for my liking! :)

Anyway, so far I have started to save a load of useful written sources, image locations, and reference videos from YouTube onto my Delicious bookmarking account, so I have lots of references to looks at and perhaps use when it comes to actually starting this essay, etc. in October.

I have a lot of things to be working on and practicing during the rest of my summer break that I put on my action plan for this project...

 1) CG Lighting Techniques with 3ds Max book - read about theory and complete as many tutorials as possible to help with lighting knowledge. << I have done 3 of these tutorials so far, so am feeling my skills improving slightly.

2) Look at 3drender.com lighting and texturing challenges as examples of how moods and genres can be created and try to complete a challenge myself.

3) Research cinematography within film and animation - history, techniques, etc. - review pieces of animation, film, visualisation in terms of their cinematography and aesthetics to help with this.

Today I have started number 3 of the above tasks, and will post my reviews of films, etc. as I do them. So far I have looked at animated film 'The Corpse Bride' directed by Tim Burton, and French film 'Le Fabuleux Destin d'Amélie Poulain' directed by Jean-Pierre Jeunet. I have started with these as they are two of my favourite films of all time, to be totally honest, and I think they both use colour and lighting really effectively within them.


The Corpse Bride

Tim Burton’s ‘The Corpse Bride’ is a stop-motion animated film, with a main genre of horror/thriller, but also featuring mild aspects of comedy in parts.

The main cinematographic feature that is noticeable throughout the film is the strong use of colour and tone to represent mood and genre. During the scenes with a spookier feel, for instance, the shots are very dark, with a cool, blue tone to them, probably achieved through lighting and post-production techniques. This is also achieved during the scenes underground, where a more light-hearted, party-like atmosphere is portrayed through the use of much brighter and warmer lighting and props.

The rule of thirds has also been used a lot within the main shots, where the focus of the shot is placed slightly to the left or right of the image. Along with this technique, depth of field and lighting is also usually used to highlight this focus even more and add dramatic effect. For instance, a subject lit with bright, blue light and casting dark shadows may seem to simply show the audience that it is night time, but can also suggest a haunted or cold mood to the scene. Also, the focus shifting quickly onto a subject or action whilst the background blurs could impact the audience and add to a build-up of tension or atmosphere.


Le Fabuleux Destin d’Amélie Poulain

Jean-Pierre Jeunet’s ‘Le Fabuleux Destin d’Amélie Poulin’ is a romantic comedy set in Paris. Throughout the film, feature many different moods, including humour, happiness, passion and suspense.

Perhaps the most recognisable feature within Jeunet’s cinematography is his strong use of bright, warm colours throughout. Each and every shot somehow manages to feature these signature yellows, reds and greens within them, through lighting, props, location, and post-production techniques.

These warm colours often reflect the warm, happy mood within the plot, and can be edited slightly to show a change in mood effectively. For instance, in a scene where Amélie is daydreaming and happy, the colour is very bright yellow, then when she returns to reality and starts to cry, the shot appears marginally cooler and lower in saturation.

Another good use of cinematography within this film is the use of close-ups and depth of field effectively together. For example, I have captured a still showing a close-up shot of a sugar spoon and dish in the cafe. The strong use of depth of field within this shot, where the viewer’s eye is drawn to the spoon, combined with the bold colours and high contrast, gives a much more dramatic feel to the shot.


Thursday, 31 May 2012

Compositing Projects - Outcomes

I have now completed both projects for this compositing module, which I am ready to hand in. I am pretty pleased with the outcomes, although I would have liked to have used more accurate editing in After Effects but I have not yet got a vast enough knowledge for this standard of work. Also note, I haven't added any sounds to these videos, mainly because it wasn't stated in this particular brief, and I wanted to focus on the compositing skills rather than extra effects, etc. Anyway, here are my completed videos for both the character and creative effects compositing projects. :)


Thursday, 17 May 2012

Compositing 2: Creative Effects

For my second compositing/After Effects project, I have been given lots of rendered frames of a 3D scene, which I have to place together and add creative effects to in After Effects.

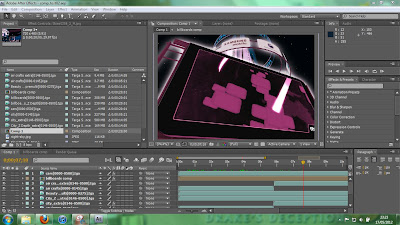
There's not really much I can say or show for this, as I keep changing my mind everytime I open it! :) Anyway, for now, I think I have decided on a color balance/saturation change to pinks and blues. I have also added a couple of glows.

Here are a few screenshots to show what I have been doing so far:


I have yet to edit/use all of the renders given, for instance one effect I will have to try and use is a lens blur, as we have been given some zdepth maps for certain frames. I may also play with more colour correction techniques such as contrast or exposure, or something totally different likea particle effect! We shall see...

Compositing 3D into a photograph :)

The first of two compositing projects for the end of my second year involves animating a character realistically into a still photograph or video file.

I have experimented with my character from my previous animation project with a chrome material (this was advised in the brief, so I hope I am not cheating :D ) into a photograph on a reflective work surface from the kitchen.

Part of the brief states the character must walk/go behind an object in the image, compositing in 3D using the shadow/matte/reflection material. In this example I have used a mug, and placed a 3D teapot behind it, to show that I know my material set-up is working.

Anyway, here are a couple of renders and a quick video showing how I have added depth of field using a simple zdepth map. (I still havent got the hang of making this look very effective yet - something I will practice more...)

jpeg render with environment background

zdepth map render pass

A quick sample of zdepth and len blur in action:

Wednesday, 9 May 2012

Visualisation Practice - Daylight system v. Standard Volume Lights

Basically, because I rather like doing visualisation work, I have decided to keep practicing it, seeing as it's nearly the end of the year and only have one project left to do (well.. two mini ones I think). First of all, I just made a simple room with 2 windows in 1 wall and a camera facing this wall. I then added a few objects, before trying to add light and shadows from the windows.

Firstly, I tried using standard lights with the volume light effect coming from outside the windows. I also used a couple of standard omni lights of a similar colour to the wooden floor to light the scene generally.


Secondly, I tried using a daylight system to add lights from outside the windows. With this, I then experimented with the mr (mental ray) sky and daylight settings, so I could have the illusion of a ground plane outside. I also used some photometric omni lights for the same effect as the previous example. However, for these lights, I had to combine their "kelvin" levels and the photometric exposure settings to get my desired colour and brightness.


I think if I used these techniques combined (i.e. use a daylight system and photometric lights, but also adda couple of volume light effects onto photometric spotlights from the windows?) then I could achieve a better effect overall.
 

This is only very simple lighting in terms of visualisation, and I will be learning and trying muuuuch more over the summer, as lighting and cinematrography are the main parts of my research question. :)