Pages

Tuesday 26 March 2013

External Client Project Outcome - Rendered Images

The main outcome for my client project was to submit my 3ds max project file and texture folders, but I also decided to render stills of each wall in their environment using a merged file of all of our models in one scene. I did these using my final textures on my parts, and texture the rest in a light grey to highlight to the client which part was created by me.

Here are my rendered images of my final models:


Tuesday 19 March 2013

Castle Texturing - Diffuse Maps Done.. I think

As the title suggests, as I aimed to do, I think I have completed the main diffuse maps (colour information) for the textures of all three of my walls of the castle now and it is looking pretty good. I know I am not great with normal maps from what I have experimented with so far in photoshop, but think I should be able to add a little more detail with this when I have made these maps from my diffuse textures - hopefully by tonight or earlier tomorrow. If I have time, I may also look into how specular/reflections can be creating through texture maps, to see if I can improve the effect of the windows.

Below are a few renders of the (pretty much) final diffuse textures on a merged file of the castle walls. (Notice I have also added a basic plane for the roof... not sure if I have time to do the chimneys too - I shall see!)

View from East front wall
View from North front wall
View from South front wall


Monday 18 March 2013

Texturing Update - North front wall and Basement/kitchen

I am currently rather ill if I am honest, but still trying to do a bit work here and there until I start to feel the effect - trying to get the texturing done a couple of days before the deadline would be nice! At least I don't need to do a walkthrough for the client, so no rendering this time (woohooo).

I have tried to texture the north front wall and basement areas in a similar style to the other sides of the building and here are some iterations of the texturing process so far, up to the point of having most of the diffuse detail mapped out:

1 - Texturing the main walls and edges
2 - Texturing the windows, door and pillar detail
3 - Texturing the window and door frames to add final effect

I think this is working quite well, although some changes to be made before creating the normal maps could be to change the colour and aging on the main balcony area (edges and pillars) on the basement, aswell as slightly more detail on some window frames, and making these match with other walls a bit better.77


Thursday 14 March 2013

Castle Texturing - getting there!

I am now in the final week or so of this client project - time has flown by and am finding myself frantically trying to finish texturing and organising the project for submission on the 22nd.

I have been working on the East and South front walls so far, unwrapping them all using the flatten mapping tool and texturing in Photoshop. Okay, so originally the plan was to use so called 'vector textures' but Illustrator seemed quite challenging to get to grips with in terms of producing more realistic textures, so we decided to go back down the Photoshop route for now. We have also been given the Substance Designer software to consider using for the project, although I still haven't figured out how to use this effectively, as my textures tend to look less detailed using this substance method, but I still have a few days at the end to consider producing a version with these textures used with the same source bitmaps, etc.

Here are some of my main textures and examples of unwraps so far to show how it looks at the moment...


East front main wall - added some dirt and detail since meeting
Main pillar unwrap

Entrance steps unwrap

East front main wall unwrap


South Front texture progress

South front main wall unwrap

South front balcony unwrap

From looking at these now, and also merging in 3ds max, I can see that they are slightly different colour tones, as in the south front wall seems more much yellow and saturated, so this is something I can work on later on when adding finishing touches. Also, the archways on the south front wall are proving difficult to texture effectively because of the low poly effect on the tops of them, so I may add a few more segments after texturing, by collapsing the unwrap modifier onto the editable poly modifier in 3ds max, therefore not effecting the final texture.


Another technique I have been working on is creating normal bump maps. This is basically like a bump map I am used to using in 3ds max, where an image is created to add an effect of relief, but it also effects lighting and shadows. These normals maps are blue and purple mainly in colour, and I am creating them using the nvidia normal map filter in Photoshop. Here is an example of how I have experimented with it so far...

End pillar normal map test

East front wall normal map test

South front wall normal map test


Tuesday 12 March 2013

Artefact 4 Evaluation and Outcomes

Artefact 4 - Genre with Camera

The aim of this artefact was to experiment with camera techniques in order to add to the mood and atmosphere I had already created in my previous artefacts. In addition to this, I decided to focus on specific genres used in film, to help with research of which techniques would be most effective. The genres and styles I chose to work with were horror, thriller, and mystery, mainly due to them all using quite similar techniques and complementing the mood that I had currently created well.

In response to feedback from my previous artefact, I made some improvements to my scene before working on camera techniques. For instance, I added some blue lights through the ceiling windows with a slight volume effect, to add contrasting colours and a moonlight effect. I also added an ambient occlusion material, so I could produce a separate render pass to add to my final rendered outcomes.

For my outcomes for this artefact, I decided to produce five rendered images using separate cameras. From researching my chosen genres, I realised that the best techniques to use would include close-up/extreme close-up shots, birds eye view shots, low camera angles, slanted camera angles, and shallow depth of field. I therefore tried to use a mixture of these within my images, also considering how they could fit together in an edited video for my next artefact. I particularly used depth of field a lot throughout all five images, as I found this added to the effect I was trying to create, as well as adding a more filmic style.

Once again, I found most of my feedback in the focus group was positive in terms of the aesthetics of my artefact. I also received some suggestions to take into my final artefact, such as considering both animation and sound of features in close-up shots (ticking clock, creaking door, etc.) when editing my final video. It was also suggested that I could consider making some of the windows appear broken, to add more to the derelict, uncomfortable atmosphere, and to add contrast to one of my camera shots.


Wednesday 6 March 2013

Castle Texturing - Busy!

I haven't posted in a while for this project, mainly because texturing has taken a long time for me to get my head around - unwrapping and then making the textures. Eventually after playing around with Illustrator and Substance Designer for a while, I decided that the whole 'vector texture' thing may not work out and definitely didn't look as effective as I knew I could make it in Photoshop. So for now I am making the textures totally in Photoshop, then if it is required, I am pretty sure they could be converted into vector graphics within Illustrator, although they do turn back into bitmaps in Substance Designer - confusing!

Anyway, here are some renders I have made of my pretty much complete version of the East front wall of the castle to show in my client meeting tomorrow:


I also made a quick video to show the textures with camera movement in order to gain any feedback. The only part that I think needs improving from looking at these is the door in the stairs, perhaps.


Castle Attack Project - East Front Wall Textures from Samantha Freeman on Vimeo.


All I need to do to these now is to add bumps maps and any other maps I feel necessary to bring them to life a bit more... This will either be done in Photoshop again or in Substance Designer, but I am not totally comfortable with getting a good effect with this software yet.

Tuesday 5 March 2013

Artefact 4 Planning - Genre with Camera

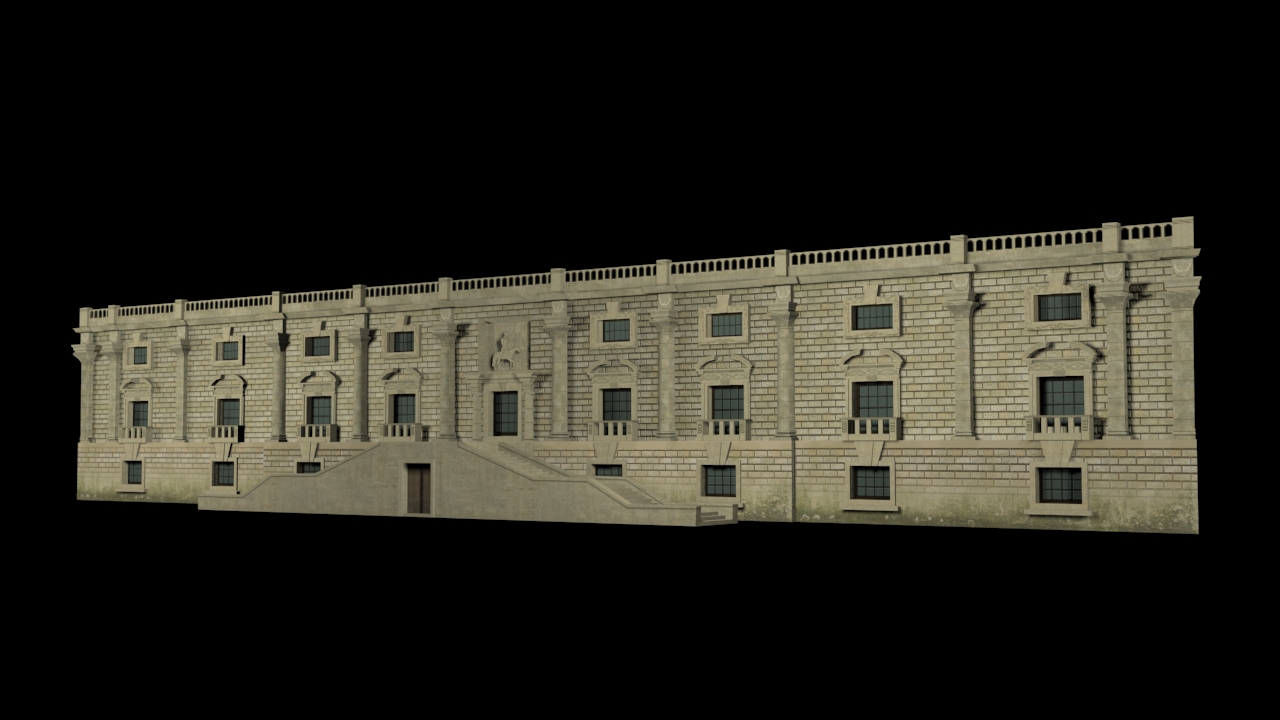
For my 4th artefact of 5, I plan to use the same scene as in my previous texturing artefact with improvements (lighting, unwrapping, ambient occlusion) to experiment with CAMERA TECHNIQUES. Specifically, I would like to research and test how camera techniques are used within different film genres, therefore creating different moods.

The main techniques I will look at are:

  • Camera angles
  • Camera shots (long shot, mid shot, close-up, etc.)
  • Focus & depth of field
  • Overall composition (rule of thirds, etc.)

I could then take this further for my next artefact, including the techniques of camera movement and editing, to further the effect of mood and genre.


The environment I have created so far is aimed to be derelict, old, and dark. Therefore, I think it would be good to try to create the effect of a genre such as thriller, mystery or horror, so have researched techniques used within these styles.

For instance, the main types of camera shot used within the thriller genre are birds eye view shots and extreme close-ups. This also covers camera angles, with the birds eye views being high angled establishing shots, and the close-ups being more of a low-angle shot to add emotion.

Similarly, in the genre of horror, low angled shots and extreme close-ups are often used to add to a tense atmosphere. In addition, a technique also often used is a slanted camera angle, where the camera is tilted in order to create an effect of tension and disorientation.

In both of these styles, another technique strongly used alongside these choices of shots and angles is a shallow depth of field. Particularly effective in close-ups and extreme close-ups, this is where only a small amount of the shot may be in focus, in order to draw the audience's eye to a specific area or subject, or to make a subject's surroundings seem disorientating.

Examples of techniques in use...

Still from thriller film 'se7en'  using close-up and slanted angle

Extreme close-up photograph of meat hooks with shallow DOF
Another example of extreme close-up with shallow DOF

Birds eye view shot from Tarantino's 'Kill Bill vol 2'

Low angled establishing show of environment