Just a quick post to show a short flyover style video I did for my external client project of Nottingham Castle. Like my stills, it shows the parts I have modelled with full textures and the parts my peers made in a grey texture. :)
'Castle Attack' Client Project from Samantha Freeman on Vimeo.

Showing posts with label texturing. Show all posts
Showing posts with label texturing. Show all posts
Wednesday, 1 May 2013

Tuesday, 26 March 2013
External Client Project Outcome - Rendered Images
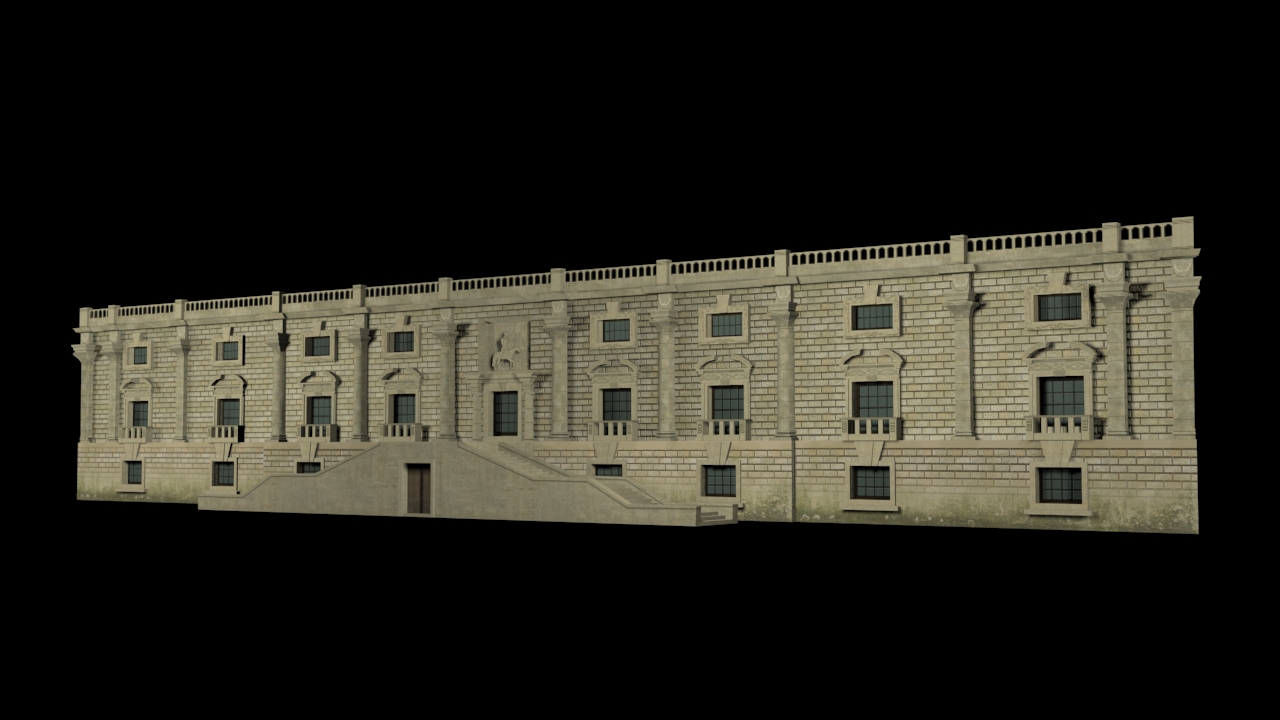
The main outcome for my client project was to submit my 3ds max project file and texture folders, but I also decided to render stills of each wall in their environment using a merged file of all of our models in one scene. I did these using my final textures on my parts, and texture the rest in a light grey to highlight to the client which part was created by me.
Here are my rendered images of my final models:


Here are my rendered images of my final models:

Tuesday, 19 March 2013
Castle Texturing - Diffuse Maps Done.. I think
As the title suggests, as I aimed to do, I think I have completed the main diffuse maps (colour information) for the textures of all three of my walls of the castle now and it is looking pretty good. I know I am not great with normal maps from what I have experimented with so far in photoshop, but think I should be able to add a little more detail with this when I have made these maps from my diffuse textures - hopefully by tonight or earlier tomorrow. If I have time, I may also look into how specular/reflections can be creating through texture maps, to see if I can improve the effect of the windows.
Below are a few renders of the (pretty much) final diffuse textures on a merged file of the castle walls. (Notice I have also added a basic plane for the roof... not sure if I have time to do the chimneys too - I shall see!)
Below are a few renders of the (pretty much) final diffuse textures on a merged file of the castle walls. (Notice I have also added a basic plane for the roof... not sure if I have time to do the chimneys too - I shall see!)
 |
| View from East front wall |
 |
| View from North front wall |
 |
| View from South front wall |
Monday, 18 March 2013
Texturing Update - North front wall and Basement/kitchen
I am currently rather ill if I am honest, but still trying to do a bit work here and there until I start to feel the effect - trying to get the texturing done a couple of days before the deadline would be nice! At least I don't need to do a walkthrough for the client, so no rendering this time (woohooo).
I have tried to texture the north front wall and basement areas in a similar style to the other sides of the building and here are some iterations of the texturing process so far, up to the point of having most of the diffuse detail mapped out:
I think this is working quite well, although some changes to be made before creating the normal maps could be to change the colour and aging on the main balcony area (edges and pillars) on the basement, aswell as slightly more detail on some window frames, and making these match with other walls a bit better.77
I have tried to texture the north front wall and basement areas in a similar style to the other sides of the building and here are some iterations of the texturing process so far, up to the point of having most of the diffuse detail mapped out:
 |
| 1 - Texturing the main walls and edges |
 |
| 2 - Texturing the windows, door and pillar detail |
 |
| 3 - Texturing the window and door frames to add final effect |
I think this is working quite well, although some changes to be made before creating the normal maps could be to change the colour and aging on the main balcony area (edges and pillars) on the basement, aswell as slightly more detail on some window frames, and making these match with other walls a bit better.77
Thursday, 14 March 2013
Castle Texturing - getting there!
I am now in the final week or so of this client project - time has flown by and am finding myself frantically trying to finish texturing and organising the project for submission on the 22nd.
I have been working on the East and South front walls so far, unwrapping them all using the flatten mapping tool and texturing in Photoshop. Okay, so originally the plan was to use so called 'vector textures' but Illustrator seemed quite challenging to get to grips with in terms of producing more realistic textures, so we decided to go back down the Photoshop route for now. We have also been given the Substance Designer software to consider using for the project, although I still haven't figured out how to use this effectively, as my textures tend to look less detailed using this substance method, but I still have a few days at the end to consider producing a version with these textures used with the same source bitmaps, etc.
Here are some of my main textures and examples of unwraps so far to show how it looks at the moment...

From looking at these now, and also merging in 3ds max, I can see that they are slightly different colour tones, as in the south front wall seems more much yellow and saturated, so this is something I can work on later on when adding finishing touches. Also, the archways on the south front wall are proving difficult to texture effectively because of the low poly effect on the tops of them, so I may add a few more segments after texturing, by collapsing the unwrap modifier onto the editable poly modifier in 3ds max, therefore not effecting the final texture.
Another technique I have been working on is creating normal bump maps. This is basically like a bump map I am used to using in 3ds max, where an image is created to add an effect of relief, but it also effects lighting and shadows. These normals maps are blue and purple mainly in colour, and I am creating them using the nvidia normal map filter in Photoshop. Here is an example of how I have experimented with it so far...
I have been working on the East and South front walls so far, unwrapping them all using the flatten mapping tool and texturing in Photoshop. Okay, so originally the plan was to use so called 'vector textures' but Illustrator seemed quite challenging to get to grips with in terms of producing more realistic textures, so we decided to go back down the Photoshop route for now. We have also been given the Substance Designer software to consider using for the project, although I still haven't figured out how to use this effectively, as my textures tend to look less detailed using this substance method, but I still have a few days at the end to consider producing a version with these textures used with the same source bitmaps, etc.
Here are some of my main textures and examples of unwraps so far to show how it looks at the moment...

 |
| East front main wall - added some dirt and detail since meeting |
 |
| Main pillar unwrap |
 |
| Entrance steps unwrap |
 |
| East front main wall unwrap |
 |
| South Front texture progress |
 |
| South front main wall unwrap |
 |
| South front balcony unwrap |
From looking at these now, and also merging in 3ds max, I can see that they are slightly different colour tones, as in the south front wall seems more much yellow and saturated, so this is something I can work on later on when adding finishing touches. Also, the archways on the south front wall are proving difficult to texture effectively because of the low poly effect on the tops of them, so I may add a few more segments after texturing, by collapsing the unwrap modifier onto the editable poly modifier in 3ds max, therefore not effecting the final texture.
Another technique I have been working on is creating normal bump maps. This is basically like a bump map I am used to using in 3ds max, where an image is created to add an effect of relief, but it also effects lighting and shadows. These normals maps are blue and purple mainly in colour, and I am creating them using the nvidia normal map filter in Photoshop. Here is an example of how I have experimented with it so far...
 |
| End pillar normal map test |
 |
| East front wall normal map test |
 |
| South front wall normal map test |
Wednesday, 6 March 2013
Castle Texturing - Busy!
I haven't posted in a while for this project, mainly because texturing has taken a long time for me to get my head around - unwrapping and then making the textures. Eventually after playing around with Illustrator and Substance Designer for a while, I decided that the whole 'vector texture' thing may not work out and definitely didn't look as effective as I knew I could make it in Photoshop. So for now I am making the textures totally in Photoshop, then if it is required, I am pretty sure they could be converted into vector graphics within Illustrator, although they do turn back into bitmaps in Substance Designer - confusing!
Anyway, here are some renders I have made of my pretty much complete version of the East front wall of the castle to show in my client meeting tomorrow:


Castle Attack Project - East Front Wall Textures from Samantha Freeman on Vimeo.
Anyway, here are some renders I have made of my pretty much complete version of the East front wall of the castle to show in my client meeting tomorrow:


I also made a quick video to show the textures with camera movement in order to gain any feedback. The only part that I think needs improving from looking at these is the door in the stairs, perhaps.
Castle Attack Project - East Front Wall Textures from Samantha Freeman on Vimeo.
All I need to do to these now is to add bumps maps and any other maps I feel necessary to bring them to life a bit more... This will either be done in Photoshop again or in Substance Designer, but I am not totally comfortable with getting a good effect with this software yet.
Sunday, 24 February 2013
Artefact 3 Evaluation & Outcomes
Artefact 3 - 'Worn Out'
This time, mainly due to time restraints involved with texturing, I decided against producing an outcome early to gather feedback from an online survey, and instead put my time into my texturing and get detailed feedback in my tutorial focus group. Also due to time restraints, I made the decision not to unwrap objects in the scene, but instead used the UVW map modifier to create a similar effect with some of the graffiti and grunge maps in my textures.
In my presentation, the main constructive feedback I got from my tutor and peers, in terms of texturing, was that unwrapping objects could improve the effect of some of the textures, making them seem more realistic and less tiled. Some other general suggestions were to enhance edges with ambient occlusion, experiment with different colours of furniture and light for more contrast, and that camera angles and composition could improve the effect of an uncomfortable atmosphere further.
However, the feedback for this artefact was mainly positive, with many saying that the overall quality of my work had improved vastly since some of my earlier projects and artefacts. I also feel that this is the case, with attention to detail in textures and more thought going into my lighting making the overall outcome much more aesthetically successful.
Due to both feedback during my presentation and responses to my previous survey, I have chosen to focus on camera techniques in artefact four. The main techniques I will initially experiment with will be camera angles, shots, and depth of field. I could then take this further in my final artefact, including camera movement and editing skills to create a final video outcome.
Edited renders:


Textures created in Photoshop (using grunge maps, typography, etc.) :


Friday, 15 February 2013
Artefact 3 Plan - "Worn Out"
For my third artefact I will be focusing mainly of the technique of TEXTURING. My primary aim is to produce an atmosphere for my environment to make it feel worn and derelict. Although I have found that lighting can add mood to the room quite effectively, I have also discovered that other techniques, such as more detailed textures, can give much more feeling to a CG environment for the audience.
Keywords for this artefact:


Keywords for this artefact:
- Worn
- Used
- Derelict
- Abandoned
- Vandalised
- Old
These have given me the following initial visual research for this artefact...
Texture Examples


Photographer - Jeff Wall


Examples of Graffiti/Vandalism in Interiors


Examples of CG Environments with Derelict Feeling


As well as looking at the textures used in these examples I have found, it is also worth noting the positioning of objects to add to the effect, such as hardly any furniture in place, and things not looking as tidy as they would in a newer, in-use environment.
Tuesday, 22 January 2013
Working on Artefact 1
On this post I will keep uploading progress of the artefact so far, and reflect on what I have done and want to achieve.
So far, before starting the actual artefact of lighting a winter morning atmosphere in the environment, I have firstly switched over to mental ray and edited most of the materials accordingly to add a little more believability to the whole thing.
So far, before starting the actual artefact of lighting a winter morning atmosphere in the environment, I have firstly switched over to mental ray and edited most of the materials accordingly to add a little more believability to the whole thing.
 |
| Mental Ray renderer using Arch & Design materials - more realistic.. |
 |
| ..Compared to my previous renders using scanline and standard materials - less believable |
Monday, 21 January 2013
Practice-Led Research - Artefacts
The second part of the research project module involves using 5 artefacts as 'practice-led research' in order to further explore my research question.
My research question I have explored in my document is:
"How is cinematography used when creating an atmosphere or mood within a CG environment, and which techniques are most effective?"
When proposing my possible artefacts within the document, I suggested that..
"To explore methods for creating atmosphere and mood, experiments with cinematographic techniques and the 3D pipeline would be produced. For example, using the same environment, many experimental renders could be produced, each using different techniques such as camera angles, lighting, or colour schemes to try to create mood within this environment."
After discussing this further in recent tutorials, I have decided on the following approach to my artefacts, where 3-4 techniques can be explored:
Artefacts 1 & 2: Exploration of lighting - Time and mood
Artefact 3: Texturing techniques - Changing the feel of a room
Artefacts 4 & 5: Camera techniques - Angles, effects, movement


My research question I have explored in my document is:
"How is cinematography used when creating an atmosphere or mood within a CG environment, and which techniques are most effective?"
When proposing my possible artefacts within the document, I suggested that..
"To explore methods for creating atmosphere and mood, experiments with cinematographic techniques and the 3D pipeline would be produced. For example, using the same environment, many experimental renders could be produced, each using different techniques such as camera angles, lighting, or colour schemes to try to create mood within this environment."
After discussing this further in recent tutorials, I have decided on the following approach to my artefacts, where 3-4 techniques can be explored:
Artefacts 1 & 2: Exploration of lighting - Time and mood
Artefact 3: Texturing techniques - Changing the feel of a room
Artefacts 4 & 5: Camera techniques - Angles, effects, movement
Although I recently posted a possible environment for my artefacts in the form of a lounge/diner area, I have now changed my idea and decided on a classroom scene. This scene uses large windows from both the back wall and the pitched ceiling, as a good source of natural light, as well as incorporating hanging ceiling lights as a possible source of artificial light, useful when experimenting with using light to show different times of day or year. The scene was mainly influenced by an artist studio model I found on the lighting challenges at the 3drender website (http://3drender.com/challenges/artistry/index.html), as I thought it was a good example of potential to show character through a simple model of a room.
So far, I have modelled all of the main features of the room, and only applied simple textures and added basic lighting to help whilst producing the scene. I will add more detail in the form of textures, lighting, props, and effects, depending on what I am trying to show in each artefact. I have not put too much time into high quality modelling, etc. due to this research being focused on cinematography techniques more so than modelling and texturing.


Monday, 7 January 2013
Possible Environment for Research Artefacts
Over some of the Christmas break I started a couple of basic environments to use for my artefacts, using both new models and other high quality models I have made in my spare time in the past. I firstly looked at attic rooms (conversions) as being good for sources of light (skylight windows), as well as looking at large full-length windows for the same reason. The idea I have developed more and plan to work on much more in the next week or two is quite a basic open plan lounge/diner area. The main feature of this room will be the wooden beams on the ceiling, to try to add character to the room rather than just be an ultramodern, fashionable space. Another important aspect is the use of large full-length windows, to add a potential effective light source for an artefact.
(I have not yet scanned in my original sketches of ideas for the artefact work, but will upload these later this week when I find time or remember!)
Here are some quick renders of where I currently am with this environment, with 3 out of 4 walls made, and some furniture and decoration in place and basic textures to show the general idea.


 |
| Full-length windows to add light/mood? |
 |
| The image I will base my environment/interior upon - open plan with character |
(I have not yet scanned in my original sketches of ideas for the artefact work, but will upload these later this week when I find time or remember!)
Here are some quick renders of where I currently am with this environment, with 3 out of 4 walls made, and some furniture and decoration in place and basic textures to show the general idea.


So far, I think the style of the space is what I wanted to achieve, but I also think I should add more detail to some parts and work on texturing, as well as obviously adding many more objects to the scene. For instance, I feel an important object to add would be a light source, due to my research project being based mainly upon lighting to add mood - this could be a lamp, spotlights, candles, etc. Also, the brick wall within the room currently only has a diffuse and bump map on the whole surface, so I could consider modelling this to add more detail and realism to the space.
Subscribe to:
Posts (Atom)