Pages

Thursday 26 April 2012

"Location Location" Project Evaluation & Outcomes :)

Animation:

4 High Resolution Stills:


Evaluation:

For this project, my task was to produce a 60 second walkthrough of an interior space from a different time period, using a description from a book. The book I chose was ‘Of Mice & Men’ by John Steinbeck, as it was a book I read back in my school days and remembered a particularly good description of the main setting of the novel – the bunkhouse.
                The description, from the start of the second chapter, mentioned many aspects such as room shape, doors, windows, beds and many other objects and their materials within the one large room. This helped a lot with my initial ideas and research I needed for my presentation. After the research, I sketched out all of the objects I needed in the space, as well as producing a moodboard for textures and mock-ups of the layout. I think the encouragement that the presentation brought upon me to research the theme and explore ideas towards the start of the project really helped with the development of my work. I think that without this pressure, I could have left it until a lot later in the project and not have achieved such a successful piece of work.
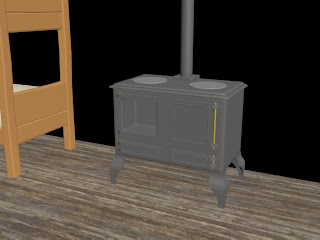
                After all of this pre-production work, I then started to model my scene and choose the best textures I had gathered within my research. I think my modelling skills have improved drastically within this project, as well as from my experience in the last visualisation project. I particularly think my model of the cast iron stove was very good in comparison to some of my previous models. I only gave this a simple standard material with a bump map, however, so it could have looked better with more texturing knowledge.
                I hardly used the unwrap modifier within this project, and found the UVW map modifier much less frustrating to use, and just as effective, if not more in some cases. I used a lot of the same wood texture (found from cgtextures.com) within the scene, but edited the hue and saturation levels in Photoshop to give different wood shades for different objects.
                Once again, lighting is one aspect I am not overly happy with in this piece of work. This is mainly due to the fact that I wanted to use the volume light effect on some of my lights to show the morning light streaming through the windows, like it is later described in the book. However, to render this in the animation sometimes took approximately 6 minutes a frame, so I found it highly impossible to achieve within my time limit. However, I did use one volume light coming from the centre window on one of the walls in my high resolution still frames, to show the effect I wanted to achieve in my animation. I think this looks quite a bit better, but still could work on more atmospheric light effects, which is why I have chosen a similar topic for my research project next year.
                Overall, I am pretty pleased with the outcomes of this project, and think my modelling and texturing has kept on improving drastically since the start of this year. I also think my knowledge and use of lighting and rendering is improving a little too, and is something I will work on more. I am still eager to specialise in environment design, and this project has heightened my interest in the field of visualisation as a future career.

Sunday 22 April 2012

More visualisation progress - neearly rendering!

I think I have now finished modelling my interior scene and have been working on lighting for the last day or so, trying to achieve a simple 'morning light' type atmosphere. It won't be anything too special for now, as I plan to learn more about this in my research project next year, and I have limited rendering times to consider.

For instance, I do want to use at least one volume light to add more depth into my scene, but once one or more of these effects are added, the render times practically double or treble, so I might leave it for now and hope it still looks okay. I have also decided against using photometric and Mental Ray lights for the project, for similar reasons, and I feel slightly more confident using the standard lights at the moment.

Anyway, here are a couple of renders of the lighting situation at the moment in my scene, which I think will be pretty similar to the final product:


I have used quite bright lights from all of the windows, but made one side (the right windows) emit more of an orange, intense light, to try and achieve a similar tone and intensity of morning light. I realise I could have used an accurate daylight system for the location, but I do not feel very confident with this technique, and did not want massive render times, again. The more I look at the renders, I think that having the strong light and shadows on both sides of the room does look quite strange, but I will mess around with this more before I render it. Because I have higher windows, this also limits the shadows on the ground, but I think this is quite realistic so will leave this as it is. I have also tried to get shadows from the exposed wooden planks on the end wall, but did not want to make this too prominent in my scene, so made it more of a subtle effect.

Now, as well as finished off and tweaking the lighting set up (flickering fire light, colour alteration, etc.), I need to create my camera(s) and place/animate them to create a walkthrough effect. I must admit, the idea of filling up 60 seconds, with what is quite a small interior space, sounds quite hard with just one walkthrough camera. Therefore, I have looked at one of my preferred visualisation companies' portfolios and videos, and have found some examples of using a combination of a general walkthrough camera (slow moving around the space) and fading into more close-up shots of different aspects within the space. This video shows this technique quite well:


Thursday 19 April 2012

Visualisation Update - texturing and modelling

So now I finally have the animation project out of the way, I have been working lots on modelling and texturing for the 'Location Location' visualisation project. I had already built the main shape and objects for my bunkhouse, but have now started texturing everything as accurately as time limits will let me, and modelling extra objects to make the space look more 'lived-in' and believable.

These objects are mainly the things that are mentioned to be in the apple boxes on the beds, as well as other things like suitcases and personal belongings scattered on the floor/beds. I have also got to make more playing cards to put on the table - I will scan in for textures I think!

Here are a couple of screenshots of my current progress (just general omni light and no shadows at the moment before I start lighting!)


I have also experimented with using video files at textures for the fire inside the stove. This is sort of cheating and a quick way of making a fire animaiton without the particles and extra rendering time - clever. I will probably add some kind of glow/ambient light to this area, to make it look even better.

(Veryyyy short video by the way - just to give the general jist!)


Friday 13 April 2012

Silent Comedy Animation + Evaluation.


For this project, my task was to produce a 60 second character animation, following the theme of silent comedy and slapstick.  I had to create a character that could apparently think, decide, pick something up, drop something, walk, climb, trip, slip and fall, by creating a suitable CAT rig and using the skin modifier in 3ds Max.

Towards the start of this project, I strongly focused on learning various modelling and animating techniques from tutorials given to us throughout the project, as well as coming up with the general main plot for my animation, and choosing the character that I wanted to use. I then started following more of these tutorials, using my character concept and drawings to help me create my final work.

I chose to create a geeky male character for my animation, in a scenario that a geek would perhaps not be comfortable in usually – playing basketball. I wanted my character to get angry whilst failing at getting a basket, and then get hit in the face by the ball and slipping over (like in a typical slapstick comedy).

I briefly looked at some slapstick comedy towards the beginning too, such as Charlie Chaplin and Warner Bros, but I feel I didn’t do as much research into the theme as much as I would have liked, and tended to focus on the animation and modelling more. I think if I had have planned and researched better, my project may have been more thorough and successful, however I am quite pleased with my outcome to say I am not particularly interested in the field of character design and animation as a career.

I spent a lot of time of this project on modelling and texturing the character itself before any of the animation or environment was started. I found the modelling of the character quite time consuming, but pretty straightforward when following the tutorials I had. However, the UVW unwrap modifier was something that took me a while to get my head around at first, in particular the peel tool. I also found when painting my character in Mudbox, that it was quite hard to make my texture map as neat and tidy as I would have liked, so ended up doing the rough outline in this software, before tweaking it properly in Photoshop to get rid of visible seams and mistakes.

I then moved onto another complex part of the project – CAT rigging and the skin modifier. I found making my own CAT rig quite simple to understand in 3ds Max. The skin modifier and the “edit envelopes” option, however, I found quite frustrating and still did not get my character’s skin to move as I would like it to when I animated the bones. For instance, when he bent over, the shorts would cut into the t-shirt no matter how many times I tried to improve the envelope settings.

I then created my simple environment and props in the scene, before animating it all within this environment. This included a road, a house, a basketball hoop, basketball, dustbin, etc.  I tried to make this environment as simple and as similar to the cartoony style of my character as possible.

Overall, I am quite happy with the outcome of this project in terms of my limited time schedule and other commitments in other areas of my pathway. Although, currently, I am not as interested in animation and characters as other areas such as visualisation and environment design, I feel I have learned some important skills throughout this project, such as rigging and UVW unwrapping, and it is something I could consider learning more of in the future.

Monday 2 April 2012

Update on Visualisation Project

To give myself a bit of a break from the animation project, I have been trying to get some of the modelling doing for my 'Location Location' visualisation project. A lot of this modelling is quite basic for now and will hopefully look considerably better once textured and lit properly later on in the project. :) As this area of work (visualisation/environment design) is the area which I most want to end up working in, I feel I am going to concentrate on the texturing and detail much more than in my other project, to try and help me get a little better before the research and client projects next year.

Anyway, here are a few quick renders showing the basic untextured models so far... (I have textured a quick floor and made some whitewashed wooden planks too which I used to test lighting effects)

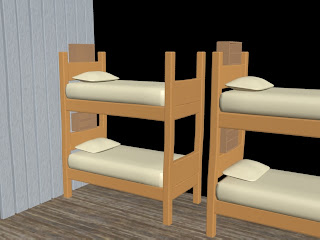
Bunk bed model with apple boxes (no sheets)

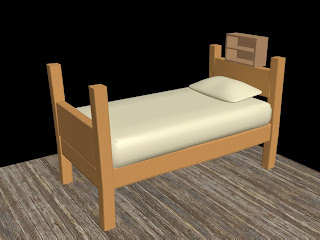
Single bed model with apple box (no sheets)

Iron cast stove with chimney model

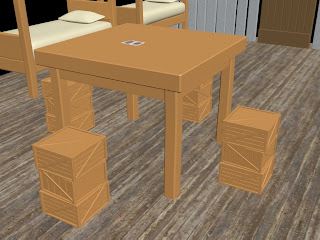
Models of square table, and wooden crates as seats

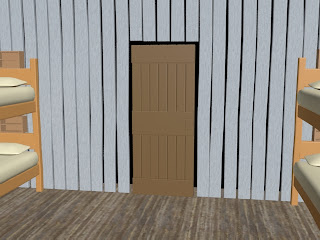
Wooden barn-style door model (and the previously mention planks I made to experiment with how light could pass through)

And to show the general spacing and layout of my scene so far: