I haven't been to uni for the past week, due to cancellations and illness - I am still getting over it now, although I am feeling a lot better than before, I still can't concentrate for as long as I would like without feeling icky! :(
Now is one of those moments, so thought I would try and blog some of my progress in the next due project - After Effects 'Fantasy Olympics' animation. This is due next Friday, so I am getting a bit stressed at me not being able to do much work at the moment, and I keep changing my ideas and designs every day so I'm not getting very far...
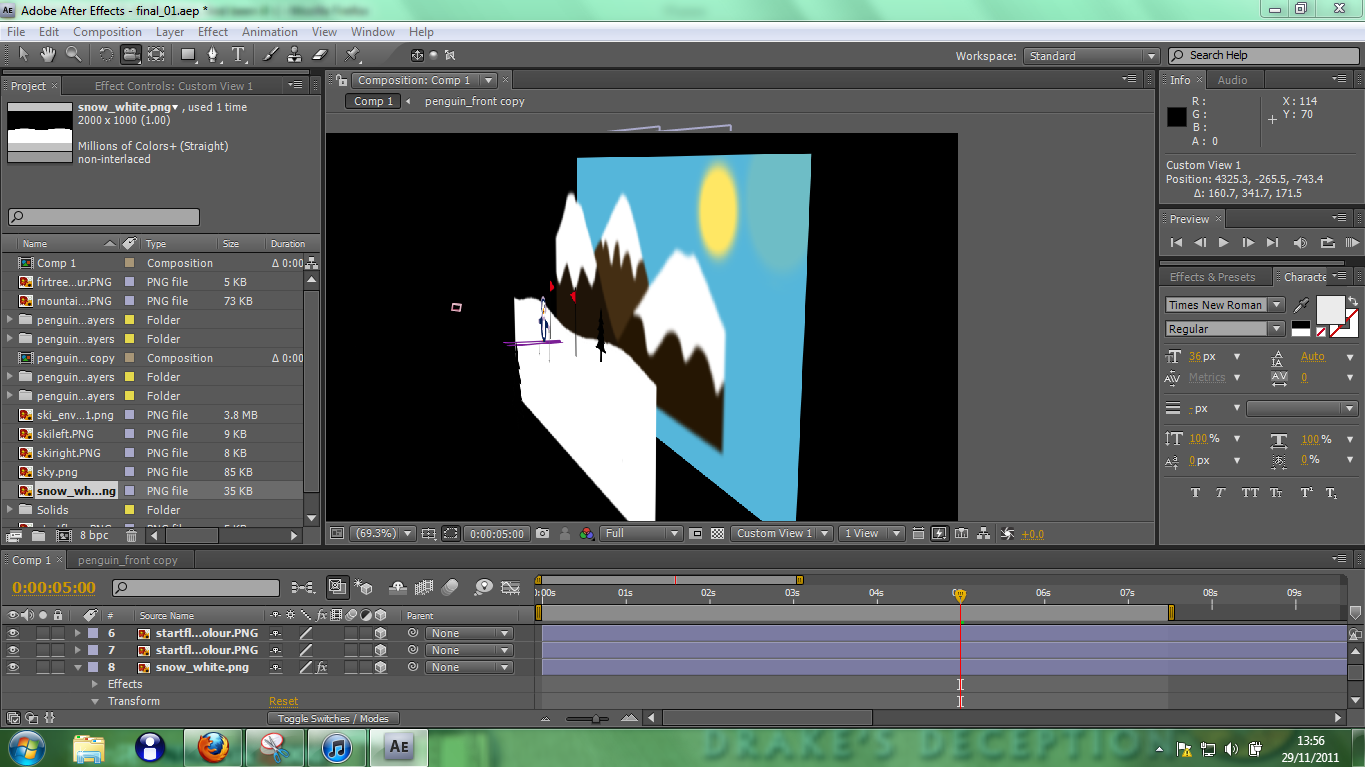
I think I am sticking to what I have done today though, I changed my design from a black outlined drawn environment, to just sticking to the shapes I drew as solid colours. I have also started experimenting with layering up my scene in 3D and making the further away or really close parts more blurred, to give an effect of depth of field. I have also added a CC Particle World effect with the directional axis style to simulate animation of the rocket skis, which I think looks quite cool.
I have no idea where my animation is going to be honest, therefore dont know how I am going to fill 30 seconds. I have probably only done about 5-8 seconds so far with most of the first half animated. I think I will have to take a break to do a storyboard to help with this. I also need to know what an animatic is (we also have to hand one of these in), as I think this is associated with my storyboard drawings in a video?
Anyway, here are a few screenshots of my work so far..
Tuesday, 29 November 2011
Tuesday, 22 November 2011
AE Project - Ski-ing moodboard
Monday, 21 November 2011
Visualisation - modelling stuff
I haven't really posted much on this project so far, to say I have said I am interested in visualisation in my context 2 essay! (Yes this is due to the chess player project that I haven't stopped thinking about for the past few weeks - back on track now!)
Anyway, last week we did some UVW unwrap modifier, which I found sort of difficult to be honest, but can see how it will be useful when texturing more precisely in this project.
Before this, however, we did a few weeks of modelling objects to practice looking at things and modelling them well for our still life project.
I have not completed all of these, due to both absence/illness and focusing on the other projects. I have tried to complete the majority of the first task we received of modelling goggles, which I never finished. Here are a couple of screenshots to show how far I now am with this particular modelling task:
I realise this model is not perfect as I have tried to make the nose/bridge part on my own without any assistance and therefore struggled making it look decent. I think this is pretty good though for now, and will improve it if needed when texturing.
Another model I completed (actually in the seminar! :o) is the random theatre prop - the use of which we really do not know. Anyway, here is a couple of screenshots again to show the model I have made...
I am quite pleased with this model, although I did have to mirror the main box part, due to the extruded pattern on the outside not wanting to produce twice with the shape merge compound object. This may affect me when trying to texture this object, but it seems to work fine so far and saved me time too.
Anyway, last week we did some UVW unwrap modifier, which I found sort of difficult to be honest, but can see how it will be useful when texturing more precisely in this project.
Before this, however, we did a few weeks of modelling objects to practice looking at things and modelling them well for our still life project.
I have not completed all of these, due to both absence/illness and focusing on the other projects. I have tried to complete the majority of the first task we received of modelling goggles, which I never finished. Here are a couple of screenshots to show how far I now am with this particular modelling task:
Another model I completed (actually in the seminar! :o) is the random theatre prop - the use of which we really do not know. Anyway, here is a couple of screenshots again to show the model I have made...
I am quite pleased with this model, although I did have to mirror the main box part, due to the extruded pattern on the outside not wanting to produce twice with the shape merge compound object. This may affect me when trying to texture this object, but it seems to work fine so far and saved me time too.
Sunday, 20 November 2011
Back to the After Effects project
Now I am done with my chess player animation project, I am starting to focus back on my next hand-in - the fantasy olympics animation using After Effects.
Before I had my chess project obsession, I posted my photoshop edit of my penguin character drawn from the front. I have now eventually scanned in my side profile drawing of the character and edited similarly on photoshop using different layers.
Here is the drawing and the edit on photoshop:
Next, I will need to start designing an environment and decide how to go about making it to use in After Effects. Due to my main idea of going up a steep, long hill/cliff with snow - I think this maybe easier to make in 3DS Max rather than an edited still image, as I want to show movement within an enviroment. I will update as it goes further.
:)
Before I had my chess project obsession, I posted my photoshop edit of my penguin character drawn from the front. I have now eventually scanned in my side profile drawing of the character and edited similarly on photoshop using different layers.
Here is the drawing and the edit on photoshop:
Next, I will need to start designing an environment and decide how to go about making it to use in After Effects. Due to my main idea of going up a steep, long hill/cliff with snow - I think this maybe easier to make in 3DS Max rather than an edited still image, as I want to show movement within an enviroment. I will update as it goes further.
:)
Thursday, 17 November 2011
'The Chess Player' Animation - Video + Rationale
Here is my final animation:
Animation Rationale:
‘The Chess Player’ project involved me producing an animation of at least 30 seconds that showed a self-defeating chess-playing robot. To do this, I produced two robot arms (supposedly of the same robot), which I rigged and animated using IK chains and the reaction manager. I also modelled a pretty simple environment of a study/office style room, with a centre piece of table and chairs, where the game of chess between the two arms took place.
In my animation, I decided to show a very short game of chess, where the white player wins within four moves, which was animated within approximately 1 minute rather than 30 seconds. I tried to show emotion and character within my characters through movement and gestures, as they did not have eyes or mouths. A main gesture to show victory or disappointment was the nod or shake of their palms - acting as their heads. Another one I used a couple of times was tapping their fingers on the table to show thought or concentration.
Within this project, I feel I have learned a variety of very important skills used in many areas of the animation industry. Perhaps the most vital and difficult of these skills was the use of inverse kinematics (IK chains) when rigging up my robot arms, as well as using different animation constraints and the reaction manager. These techniques are associated with the field of character design and animation within the 3D pipeline.
I also feel that throughout the production of this piece of work, I have learned a lot more modelling techniques within 3DS max, such as quad modelling, the lathe modifier and attaching shapes objects with the editable poly modifier. In addition to modelling, I have also learned a great deal about texturing with both standard and mental ray materials, and the effect this can have on rendering times. An important material I learned how to use is the ambient occlusion mental ray material, which renders separately and is then composited with my original renders in After Effects to produce an animation with better quality shadows.
I found myself facing many problems during this project, mainly due to the animation aspects towards the end of the production stage. For instance, I ended up moving the chess pieces together with the hand when animating, rather than using the recommended link constraints, due to the chess pieces wanting to follow the palm even after linking them back to the world. I also had some trouble trying to make the king fall and roll at the end of the animation, as it is seemingly impossible to animate pivot points within 3DS max. I solved this by carefully rotating and moving the piece along the table so it did not move above or below the surface of the table as best as I could manage.
After doing my first 3D project this year, I can still see myself doing work in either modelling or texturing rather than an actual animation role in the future, due to the complexity of rigging and the problems I overcame whilst trying to use link constraints within this project. I have really enjoyed this project overall, however, and am now interested in the field of animated film much more, in addition to my current strong aspirations of working in visualisation or game design.
Animation Rationale:
‘The Chess Player’ project involved me producing an animation of at least 30 seconds that showed a self-defeating chess-playing robot. To do this, I produced two robot arms (supposedly of the same robot), which I rigged and animated using IK chains and the reaction manager. I also modelled a pretty simple environment of a study/office style room, with a centre piece of table and chairs, where the game of chess between the two arms took place.
In my animation, I decided to show a very short game of chess, where the white player wins within four moves, which was animated within approximately 1 minute rather than 30 seconds. I tried to show emotion and character within my characters through movement and gestures, as they did not have eyes or mouths. A main gesture to show victory or disappointment was the nod or shake of their palms - acting as their heads. Another one I used a couple of times was tapping their fingers on the table to show thought or concentration.
Within this project, I feel I have learned a variety of very important skills used in many areas of the animation industry. Perhaps the most vital and difficult of these skills was the use of inverse kinematics (IK chains) when rigging up my robot arms, as well as using different animation constraints and the reaction manager. These techniques are associated with the field of character design and animation within the 3D pipeline.
I also feel that throughout the production of this piece of work, I have learned a lot more modelling techniques within 3DS max, such as quad modelling, the lathe modifier and attaching shapes objects with the editable poly modifier. In addition to modelling, I have also learned a great deal about texturing with both standard and mental ray materials, and the effect this can have on rendering times. An important material I learned how to use is the ambient occlusion mental ray material, which renders separately and is then composited with my original renders in After Effects to produce an animation with better quality shadows.
I found myself facing many problems during this project, mainly due to the animation aspects towards the end of the production stage. For instance, I ended up moving the chess pieces together with the hand when animating, rather than using the recommended link constraints, due to the chess pieces wanting to follow the palm even after linking them back to the world. I also had some trouble trying to make the king fall and roll at the end of the animation, as it is seemingly impossible to animate pivot points within 3DS max. I solved this by carefully rotating and moving the piece along the table so it did not move above or below the surface of the table as best as I could manage.
After doing my first 3D project this year, I can still see myself doing work in either modelling or texturing rather than an actual animation role in the future, due to the complexity of rigging and the problems I overcame whilst trying to use link constraints within this project. I have really enjoyed this project overall, however, and am now interested in the field of animated film much more, in addition to my current strong aspirations of working in visualisation or game design.
Monday, 14 November 2011
Ambient Occlusion
"Ambient occlusion is a shading method used in 3D computer graphics which helps add realism to local reflection models by taking into account attenuation of light due to occlusion. Ambient occlusion attempts to approximate the way light radiates in real life, especially off what are normally considered non-reflective surfaces.
Unlike local methods like Phong shading, ambient occlusion is a global method, meaning the illumination at each point is a function of other geometry in the scene. However, it is a very crude approximation to full global illumination. The soft appearance achieved by ambient occlusion alone is similar to the way an object appears on an overcast day."
In one of Andy's tutorials on texturing and lighting, he showed and explained the advantages of ambient occlusion materials to do as a separate render. This render would then be combined with the original render, resulting in a much more realistically shaded image.
Here is an example of one frame of my animation without ambient occlusion, with one layer, and then two layers (edited on photoshop):
And here is the ambient occlusion render used to produce this effect:
After experimenting with this method, I think my renders look a lot better with at least one layer of ambient occlusion added to them, and therefore am trying to get all of my animation rendered as ambient occlusion too, although it takes a lot longer to render than my originals. If it does finish rendering, when done, I will probably use After Effects to merge the two types of footage together to achieve the same effect but in video.
Unlike local methods like Phong shading, ambient occlusion is a global method, meaning the illumination at each point is a function of other geometry in the scene. However, it is a very crude approximation to full global illumination. The soft appearance achieved by ambient occlusion alone is similar to the way an object appears on an overcast day."
In one of Andy's tutorials on texturing and lighting, he showed and explained the advantages of ambient occlusion materials to do as a separate render. This render would then be combined with the original render, resulting in a much more realistically shaded image.
Here is an example of one frame of my animation without ambient occlusion, with one layer, and then two layers (edited on photoshop):
And here is the ambient occlusion render used to produce this effect:
After experimenting with this method, I think my renders look a lot better with at least one layer of ambient occlusion added to them, and therefore am trying to get all of my animation rendered as ambient occlusion too, although it takes a lot longer to render than my originals. If it does finish rendering, when done, I will probably use After Effects to merge the two types of footage together to achieve the same effect but in video.
Sunday, 13 November 2011
Drawing and doodling...
I am currently doing some drawings of designs, poses, environment, etc. for animation project... sort of after I have done it all,, is that the wrong way around? Oh well.
Apparently we need at least 6 pages of drawings/sketches and a storyboard, so I am doing this all last while waiting for renders, because this seemed the most sensible way of doing it. I assume my original drawings of the robot arm ideas can be used for these too, so will probably just scan/copy all of the appropriate pages from my sketchbook and hand them in in the folder with my DVD.
Here are a couple of examples I have done today: (once again apologise for my rather poor iphone camera)
Apparently we need at least 6 pages of drawings/sketches and a storyboard, so I am doing this all last while waiting for renders, because this seemed the most sensible way of doing it. I assume my original drawings of the robot arm ideas can be used for these too, so will probably just scan/copy all of the appropriate pages from my sketchbook and hand them in in the folder with my DVD.
Here are a couple of examples I have done today: (once again apologise for my rather poor iphone camera)
Subscribe to:
Posts (Atom)


